Collaborating with your team on a single project file
Revit has great built-in tools for teams to work on larger projects with the need for multiple copies of files being distributed and then federated on a regular basis, the general term is “Worksharing”
There are several ways to coordinate and collaborate including creating a central model, using linked models & working within a CDE such as the Autodesk Construction cloud.
In this blog, we are going to focus on the use of a central model.
The Central Model – Overview
A Central Model is a “master copy” of the project file, in this file we have Worksets (see below), each member of the team opens the central mode and this is copied to their local computer.
A user can take exclusive ownership of a workset or “borrowed” geometry from the central model or another workset. If the geometry is owned by another team member, then a request is placed, when access is granted, the change can be made. If the element is not owned by another team member, permission is automatically granted.
When the team member synchronizes their design changes to the central model the borrowed assents are released back to the central model and all changes by other team members are synchronized with the local copy.
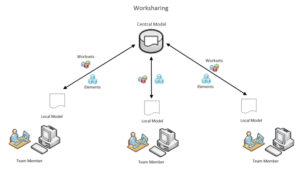
Figure 1
Preparation – Working example
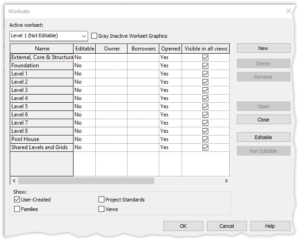
Create your worksets
Worksets are a collection of geometry in a logical group.
The first thing to do is to create worksets based on functional areas.
This may be as simple as External Wall & Grids, Level 1, Level 2 etc. or if the building is larger, External Wall & Grids, Level 1 (North Wing), Level 2 (North Wing) etc. If you are working on a BIM mandated project, these areas and levels may have already been determined in the contract documents.
Create a central model
Once you have created the worksets, Save the file to a location that the whole team has access to (this will probably be a network share) and close the file. (see Figure 3).
Members of the team can now navigate to the file from the Open command in Revit, at this point Revit will recognise that the file is a central model create a local file in the location referenced in the Options dialogue under “Default Path for user files” (see Figure 3).
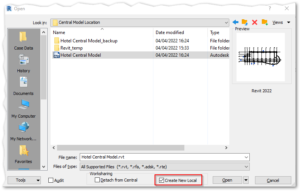
Figure 2
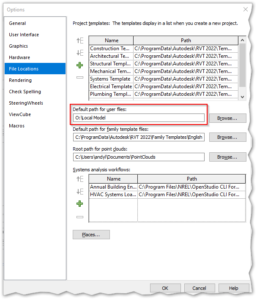
Figure 3
As you can see the new local copy refers to the Central model in the Revit Home screen.
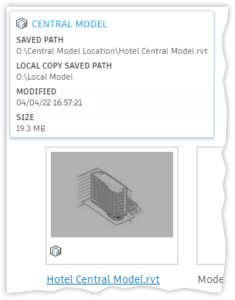
Now each team member can work on the areas of the building that are relevant to their specific needs. As mentioned above the elements can be borrowed or owned during the working day.
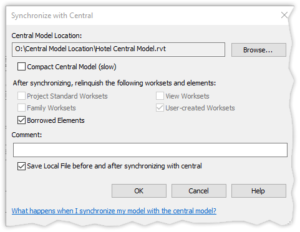
Synchronize with Center
Do this regularly and relinquish all borrowed items, there is also an option to add a Comment to track the changes that have been made during the work session.
When opening the file from the Revit Home page you will be offered the option to open the Central Model, this should only be done if changes to the central model are to be made such as adding worksets. N.B. As you can see there is a check box to disable this dialogue if you wish.
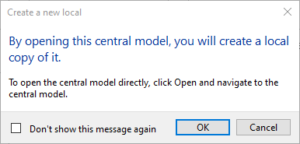
This will overwrite the local copy but not before warning the user.
You are now ready to start your day’s work, knowing that you have the latest data and all other members of the team are starting with a synchronised data set.
Good practice
- Save your local fila regularly.
- Synchronize with central and relinquish all borrowed items on a regular basis.
- Relinquish all worksets and borrowed items at the end of the working day.
- Download a fresh local model at the start of every working day.
- Compact and repair the central model as part of your ongoing maintenance or if the synchronizing becomes slow. This will clean up the Revit database and remove data that is no longer needed.
These steps ensure that all team members have the latest information for the team as a whole.
For more information please contact us today!


